Make heat packs for cooking yourself - the complete guide
Find out how to make your own heat packs for cooking. All you need is quicklime and aluminum powder and your heat pack is ready.


From Martin Gebhardt. Check out my “About me” page.
👉 The key facts from this guide
- Heat pads can be used for cooking without fire, which is particularly useful in areas prone to wildfires.
- The heat pads are made of calcium oxide (quicklime), which undergoes a chemical reaction when it comes into contact with water and generates high temperatures.
- The production of heat pads can be carried out at home by preparing a mixture of calcium oxide and aluminum powder in a ratio of 20% to 80%.
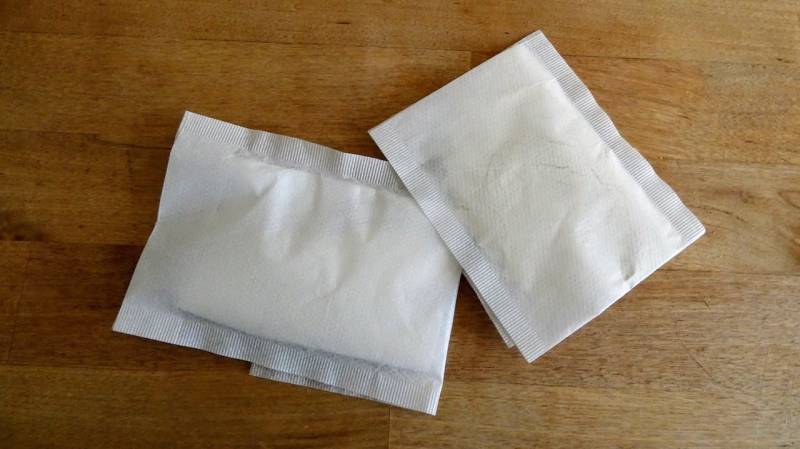
- The mixture is packed in tea or coffee filters to facilitate cleaning and ensure safe storage of the powder.
- It is important to transport the heat pads safely as they react with water. Therefore, a waterproof container is necessary.
- Working with quicklime is dangerous and requires protective measures such as gloves and eye protection.
Cooking without fire is a fantastic solution, especially in areas at risk of forest fires.
In my article, you have learned about the portable cooking system from BaroCook. This system offers many advantages for flameless cooking.
High temperatures are generated, and the risk of fire is almost zero. This way, you can also heat your food even if you are not allowed to light a fire.
However, the system also has a disadvantage: the price.
And today we will show you how to make these heating pads yourself.
The complete guide to making heat pads for cooking
According to the manufacturer, the heat packs from BaroCook are filled with calcium oxide (chemical formula: CaO), which is simply quicklime.
When in contact with water, a chemical reaction occurs. During this process, CaO is converted into calcium hydroxide with a significant release of heat. This allows you to quickly reach temperatures beyond 90 °C. These heat pads are capable of retaining heat for up to 40 minutes.
While you can get a beginner's set in different sizes relatively cheaply, a single heat pad costs around €2.
But that's the lower limit. A set of 10 pieces is available for €19.99. Not everyone wants to spend that much money on heating their food.
However, you have the opportunity to make such heat pads yourself. Today, I will show you how.
WARNING! WORKING WITH QUICKLIME IS DANGEROUS! USE GLOVES AND PROTECT YOUR EYES!
Survival Kompass assumes no liability for any injuries. Work at your own risk!
Principle of operation of heat pads
When you pour water over high-quality quicklime or milder garden lime, the calcium oxide in it converts to calcium hydroxide.
High temperatures are generated in the process. This process is also known as burnt white lime. Perhaps you have already heard of it.
However, if you only take calcium oxide, you will find that this effect is not long-lasting.
The heat does not last long, and you will not be able to cook anything with it. Sacki also had to realize this in the first part of his four-part video series "Experiment: Flameless Cooking with Quicklime".
Here it is advisable to experiment with the amount. The more quicklime you take, the more intense the reaction will ultimately be. However, you will not achieve such a satisfying result with just calcium oxide as the heat pads from BaroCook offer, especially in terms of heat retention time.
Aluminum powder provides a remedy
But Sacki was not satisfied with this result. Just like you are not, while you are still here and diligently reading along.
During his research, he came across an Asian patent. This stated that finely ground aluminum powder should be added to the calcium oxide.
The result? If you pour water onto a mixture of calcium oxide and aluminum powder, it first leads to the already known reaction.
Calcium oxide is converted into calcium hydroxide with high-temperature development. Due to the resulting temperature, there is a further chemical reaction between the aluminum and the newly formed calcium hydroxide. Calcium aluminate is formed.
Here, you can buy aluminum powder:
AztroGrit Aluminum Oxide Powder - 5 microns (avg size); 250 gm
- Made in USA. Ultra-fine, high purity (>99.7%) white Aluminum Oxide Powder - 5 microns (average particle size)
- High purity (result of our special manufacturing process) and ultra-fine powder allows microdermabrasion, exfoliation, precision polishing / lapping and rock tumbling (polishing rocks and stones) a reality. Product is compatible with all tumblers.
- **DENTAL INDUSTRY APPROVED**. Aztrogrit high-purity ultra-fine powder is being used as a (micro) abrasive in dental industry. Aztrogrit Aluminum Oxide 5 microns has shown precise micro abrasion control with exponentially better results than 27 microns, 50 microns or 100 microns particles.
- In-house special manufacturing process allows easy dispersibility in creams / cleansers (microdermabrasion / manual exfoliation). Can be also used for arts and cosmetics, and / or for etching of metal / glass, sharpen knives. Resealable and moisture-protecting stand up pouch allows you to use as much as needed.
- AztroGrit - from Aztron Technologies an AS9100 and ISO 9001 certified company.
$18.99
View ProductFor this, ideally, use a mixture ratio of 80% aluminum powder and 20% calcium oxide.
However, the proportion of aluminum powder should be at least 75%. Furthermore, make sure that the lime you have chosen has a minimum purity of 90% calcium oxide. This is also required by the mentioned patent.
When it comes to the amount of water, take roughly double the amount of powder, but no more. So as a guideline, take 100 ml of water for 50 mg of powder.
Here is the complete list of ingredients for the powder for 10x Heat Pack (200 g total, 20 g per Heat Pack):
For each Heat Pack, 20 g, you need about 40 ml of water.
With this mixture, you will achieve a similar or, depending on the quality of the quicklime, even better result than with the BaroCook heat pads.
You may even reach slightly higher temperatures and a longer duration until they subside again.
The thing with the packaging
If you have been experimenting diligently while reading, you will have noticed that there is still a big challenge: Cleaning the system.
The remaining powder, calcium aluminate, is difficult to remove from the container. It takes a lot of work and effort to get the system clean again.
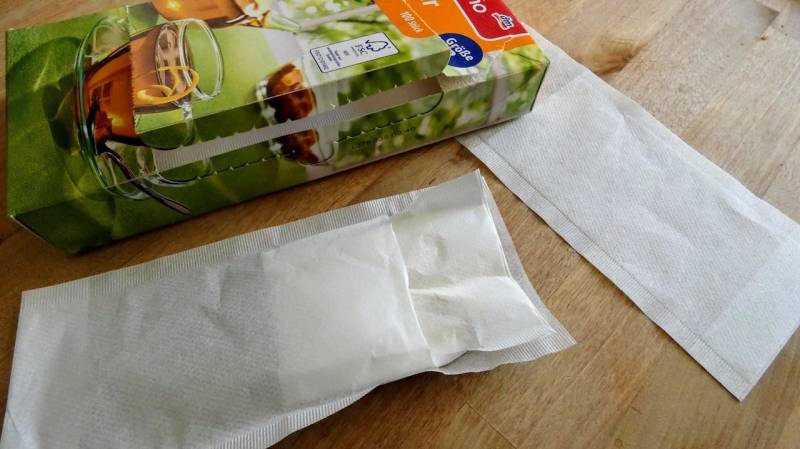
Here too, there is a solution at hand. Work with tea filters and/or coffee filters. Here are the instructions:
- First, pack the finished mixture into a tea filter
- Fold the edge several times and place this filter upside down into another tea filter

- Weißer Papierfilter
- Ideal für den Einsatz in Teekannen
- mit Klappe zum einfachen Befüllen
- inkl. Klappenlänge: 182 mm
- Chlorfreier Papierfilter, erhältlich in Weiß
no price can be determined (B01M68ILMM)
View ProductWith this double tea filter method, you will notice that only very little of the finest powder escapes and remains in your system. This simplifies cleaning by a multiple.
If you are very patient, also pack the two tea filters into a coffee filter and sew it shut. Alternatively, seal it with a stapler, for example. The finer pores of the coffee filter allow even less powder to escape.
Reading tip: Master the art of camp coffee with these 6 methods (+ DIY tip)
The thing with transportation
If you have experimented or watched one of the videos by Sacki alias Kai Sackmann, you now know how quickly and intensely the powder reacts with water.
Given this, it is also necessary to consider packaging and transportation. The heat pads from BaroCook are individually sealed in plastic.
While it is a great protection against water, it is not the best option for the environment. With your homemade heating pads, you can eliminate the plastic. However, you also lose the advantage of protecting the mixture from water.
To prevent something worse from happening when it rains or your backpack falls into the water, you need a special container. This must be able to be sealed as tightly as possible.
Just one drop of water is enough for an initial reaction!
Test your container best by submerging it temporarily in an empty bathtub or a full sink. When you take it out, dry it off, open it, and if it is dry inside, the container is excellent for use.
However, also consider that the container could be exposed to blows and falls. Your container must also withstand this so that you can safely transport your self-made heat cushions on the next trip.
Your Opinion
And, did you enjoy today's post from chemistry class? Would you like to have more experiments like this in the future, or do you find it too dangerous? Were you already familiar with the BaroCook system?
Have you followed this guide and now built your own heat pads, or do you prefer to rely on ready-made products? Have you discovered other recipes? You are welcome to share your experiences with flameless cooking in the comments.


Author of the guide
Martin Gebhardt
Hey, I'm Martin. On my blog, you will learn the basics and numerous details about living in the wild. I think survival, bushcraft and the good life in nature are the keys to happiness. Find me here on Instagram or on YouTube. You can find more about my mission on the About Me page.
Was this guide helpful?
44 people found this guide helpful.
5.00 out of 5 points (44 Ratings)
Comments (0)
This post may contain affiliate links. So if you click on the links and make a purchase, I will receive a small commission at no additional cost to you. Click here, to learn more about it.


