

How to sew your own tarp? – The complete guide with tools, material and costs

Free 35 Survival Hacks you'll love!
You will get 35 easy-to-implement survival hacks so that you don't have to stand aimlessly in the forest from tomorrow when things get tough. Take your skills to the next level!
DOWNLOAD HERE FOR FREE👉 The key facts from this guide
- To sew your tarp, you will need materials like waxed cotton (oilskin), a sewing machine, and various tools such as scissors, measuring tape, clips, and a chalk pencil.
- The instructions include various steps, including cutting the fabric, sewing the pieces together, hemming the edges, sewing the loops, and reinforcing the corners and edges.
- It is important to sew slowly and carefully, especially when sewing through multiple layers of fabric.
- After completion, the self-sewn tarp can be set up and tested in the forest. Mine weighs about 2.9 kilograms and is therefore not lightweight, but it is free of plastic and metal.
- Sewing your tarp can be a fulfilling task, although it is time-consuming and may come with some challenges.
My tarp sewing has been a long-standing wish of mine.
Outside, sleeping in my shelter in wind and weather, where all seams and parts have passed through my hands.
And that without metal and made of 100% waxed cotton.
If you now want to know how I did it, then read on and learn all the processes step by step including material costs.
Why sew your own tarp?
Do you know what MYOG means? I certainly didn't until a few years ago.
MYOG means translated: Make your own gear.
I have done this several times before, for example with this leather bag or with this axe leather sheath.
But now it should be something big: a tarp for Bushcrafting.
My requirements for the tarp are:
- the fabric should be made of 100% cotton
- do not use any metal in the form of, for example, eyelets
- enough loops so that the setup can be versatile
- waterproof, so that I am protected even in wet conditions
- it should blend in with the natural surroundings in terms of color
My demands are NOT:
- as light as possible, I would rather not use the tarp for ultra-light trekking (if you're looking for a lightweight tarp, you won't be happy with mine because it weighs almost 3 kg)
I will now share this guide with you, and you can use it to create your own tarp.
Let's get started on what material and tools you will need.
The materials and tools for your self-sewn tarp
Here is the translation of the text:
Tools:
- Cutting mat
- Scissors
- Seam ripper
- Measuring tape
- Clips
- Chalk pen
- Rotary cutter
- Ruler
- Sewing machine (more on that below)

Material:
- 7 meters Brown Oilskin from snaply.de, 300 grams per m², fabric width 150 mm
- Costs approximately 90 €
Why an Oilskin?
Oilskin is waxed cotton, which means that no water penetrates the waxed cotton. In addition, this oilskin has a fine fabric structure that allows even less water to pass through than conventional cotton.

The cotton is also quite soft compared to stronger fabrics and much moister than "Dry Oilskin". That's a good thing too because the moisture means weather resistance.
Oilskin also receives lighter crease lines through processing, which makes the tarp look really chic later on.
What can be disadvantageous, but which I am not worried about: in sunlight, the wax can come off, which then leaves stains on other materials. But since the tarp does not touch any other things when it is set up, nothing will happen there.
Oh, by the way: The wax can melt in heat, but it won't drip from the fabric in the summer. However, this also means that you cannot wash an Oilskin tarp. But the fabric is so durable that it is sufficient to brush it off.
Which sewing machine to choose?
We have several sewing machines at home because my wife and I have been sewing for a while. Therefore, we have a Pfaff Quilt Ambition 2.0 here, which costs over 700 euros.

If you don't already own a sewing machine, then don't buy such an expensive sewing machine. That only makes sense if you sew a lot.
If you only want to sew the tarp, borrow a sewing machine from a friend, buddy, or a sewing specialty store. Many stores actually offer sewing machines for rent.
And if you still want your own, then start with an entry-level model like the Brother CS-10, the Carina Professional, or the Singer 2250 Tradition.
The most important features you should consider when buying a sewing machine are:
- adjustable speed
- sewing forward and backward
- straight stitch and zigzag stitch
- as simple as possible to use
- instruction / manual
Tip: When sewing the tarp, you sometimes have to sew through multiple layers of fabric. There are 10 layers at the thickest points. So, your sewing machine definitely needs to be able to handle that. If that's not the case, use the wheel on the side to manually move the needle.
My preparations for the tarp
First, I roughly sketched how I imagined the tarp. I was thinking of a 3 x 3 meter tarp. I already own a 3 x 4 meter tarp myself, which is basically too big for me.

However, in the first sketch, I expected the fabric to come in 1 x 1.50 meter pieces. That is not the case, and that's a good thing! The oilskin came in one piece and was 1.50 meters wide and 7 meters long.
So, I made a new sketch on the computer, which shows exactly how the two fabric panels of the tarp are sewn together. Additionally, you can see on the sketch the arrangement and number of loops + their corresponding reinforcements.

My estimate of the time it would take to make the tarp was about 4 to 6 hours. Finally, it took me 6 to 7 hours and I had it finished in three days.
Clearly, it is also clear that the tarp with the fabric pieces will not be exactly 3 x 3 meters. Since we sew fabrics together and also sew the edges, it will be more like 2.80 x 2.80 meters in the end.
Ok, we have all the tools, the fabric, the sewing machine, and our plan. Let's start now!
Step 1: Cut fabric
First, I unrolled the fabric strip - so 7 meters through the apartment.
Since the fabric strip is 1.50 meters wide, I only needed to measure 2 x 3 meters.
For this, I used the chalk pen and a long wooden beam for marking. Then, I cut along the marking with the scissors.

At the end of the first step, you will have the following if you have also ordered 7 meters:
- 2x fabric panels each 3 meters in length and 1.50 meters in width
- 1x fabric piece with 1 meter in length and 1.50 meters in width
Step 2: Sewing fabrics together
The two 3-meter-long fabrics are now sewn together with a flat-felled seam. The good thing about the flat-felled seam is that it is sturdy and can withstand a lot. Additionally, it is extremely unlikely that water will seep through the seam. Take a closer look here to see how the flat-felled seam is sewn or use my image and the following video.

I recommend trying out the flat seam on an old piece of fabric beforehand.
Here I have another simple video. Just note that the lower fabric must not only protrude 1 cm, but 2 to 3 cm (depending on how wide you want your seam allowance to be).
So sew the two pieces of fabric (3 x 1.50 meters) together.
I use a straight stitch (also known as a topstitch) for all sewing tasks.
If you have three pieces of fabric, each 1 meter wide, you also sew them together with a felled seam.

At the end, the lap seam looks like this:

The challenge in this step will be to get the wide fabric through the sewing machine opening. That was quite difficult at first, but it got better with time.
After step 2, you should now have the following completed:
- Your tarpaulin, which is sewn together in the middle and forms a square
Step 3: Sewing page margins
Now, as the next step, you sew the side edges so that the fabric does not unravel. This step takes longer because you have to fold the 9 meters of fabric twice and then sew.
But be careful, you sew the first seam on the outside and the second seam on the inside at the end of the project.
So, now do the following:
- Grab the outer edge and fold it inward twice
- Then sew the outer edge firmly
Here is an image that I mean:

After step 3, you have the following:
- the edge of your tarp is completely sewn once around the outer edge
Step 4: Sewing loops
Now you prepare the loops. I want to sew on 16 pieces of them so that I can set up the tarp in a versatile way.
If you only wish to tension your tarp at the corners, then simply sew on 4 loops. You have to decide now how many loops you need.
Here is the detailed guide for 12 loops:
- Cut 24 strips from the remaining meter of fabric
- The strips must be 4 to 5 cm wide and 40 cm long
- If you want to use shorter loops than I do, reduce the length from 40 cm

Afterward, you fold the outer edges of the strip.

On this folded strip, you place a second folded strip.

Sew both strips together at the edges now.

At the end, your loop looks like this:

Now sew the ends together. Fold the ends over by 1 cm and place them on top of each other. Then sew them together. But be careful because here the needle of the sewing machine has to go through 4 layers. Sew slowly and carefully.

The loops to sew will keep you busy for a while, especially if you're crazy enough to make a total of 12 of them.
Furthermore, make sure to cut the last fabric sparingly, as you will still need a lot of it.

What you now have after step 4:
- 12 stable loops, ready for further processing
Step 5: Reinforcing Corners
Now we reinforce the corners where the loops will be sewn in step 7.
I first cut the necessary fabrics for it. I chose a triangular shape for the corners and square shapes for the sides.
The triangular shape fits perfectly into the four corners, so I did the following:
- Two pieces cut out, each measuring 20 x 20 cm
- The two pieces halved

Then fold the long edge once and cut off the protruding corner.

Afterward, you turn the reinforcement upside down so that the folded edge is facing downwards and insert it into the corners of the tarp. Make sure to push it as far as possible under the hemmed outer edges of the tarp.
Then sew the reinforcement firmly by setting two seams over the folded edge.

Do this at every corner, and you will have four reinforced corners on your tarp.
Step 6: Reinforce Edges
Next, I reinforce areas on the outer edges where additional loops will be attached.
- Cut out 12 squares with dimensions of 20 x 20 cm. If you have less fabric available, cut smaller shapes. (Image 1)
- Fold two opposite side edges (Image 2)
- Fold the bottom part a little more if you have large pieces (Image 2)
- Then turn the reinforcement over and insert it at the outer edges of your tarp where you want the loops to be (Image 3)
- Measure the spots precisely so that the loops will be directly opposite each other later
- Make sure the reinforcements are tucked under the folded outer edges of the tarp
- Sew the reinforcements securely with a double seam (Image 4)

You have now achieved the following after this step:
- Reinforcements attached to the areas where additional loops are supposed to be (now 12 in total)
Step 7: Sewing Loops
Ok, final sprint. You have two important steps ahead of you.
Now we sew on the loops. This will be tough again and will make the needle of your sewing machine glow.
Place the loop in the center of the reinforcements and sew it securely.

Surely, you know that the loops must be placed over the edge of the tarp. Later, you will secure your tarp with paracord or pegs using the loops.
Here is a graphic showing how to attach the loops ideally.
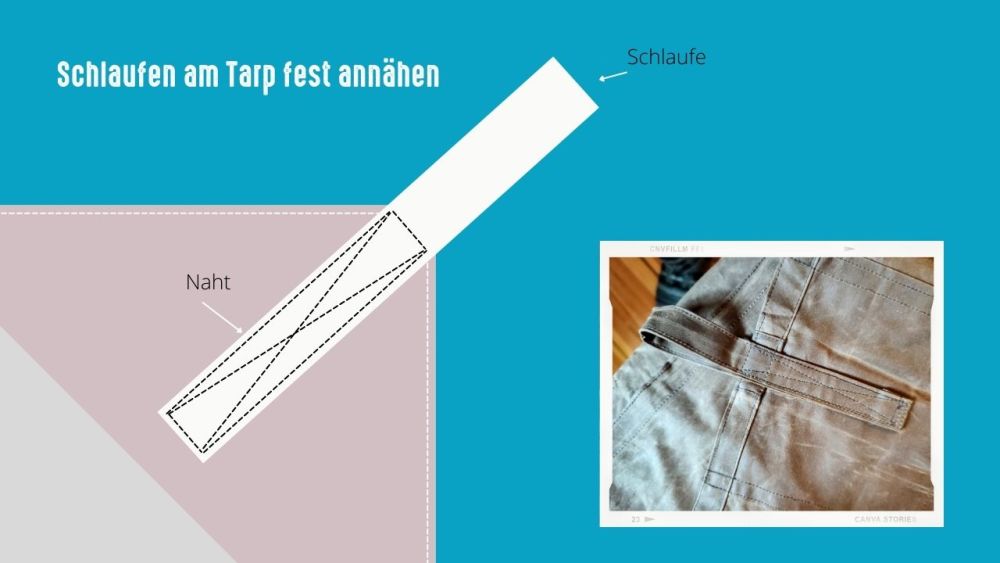
And be sure to sew slowly because the sewing machine has a lot of work to do with all the layers of fabric.
What you have at the end of the step:
- All loops are sewn on and securely attached to the tarp
Step 8: Page margins, the second seam
After everything is now attached to the tarp, sew the side edges securely with a second seam.

Step 9: Optional: Sew on additional reinforcements and loops
Since I often set up my tarp in the shape of a tent, I have sewn in an additional reinforcement in the front area. This is where the branch that stretches the tarp upwards is usually located.

The Test - Setting up a Tarp
After the self-sewn tarp was finished, I went into the forest to set up the new tarp.
And yes, it's not lightweight. Specifically, it weighs 2.9 kilograms. That's a lot for a tarp, when I look at my Unigear Tarp (3 x 4 meters), which only weighs 1.2 kilograms, or compare it to the DD Tarp at 790 grams.
But: it is self-sewn and free of plastic and metal - just a primitive bushcraft tarp.

The setup worked immediately, and I had a great time in the forest.

And another construction variant of the tarp:

Here is the test that the waxed cotton is also weatherproof.

Final Thoughts
Creating my own tarp brought me a lot of joy, and seeing it set up in the forest was even more amazing.
The biggest difficulties were in cutting the large pieces of fabric and having to squeeze half of the tarp through the sewing machine arm during certain sewing processes.
Moreover, some thick layers of fabric were challenging. The sewing machine held up wonderfully, but two needles broke because I sewed the thick layers too quickly.
Now I'm excited for the first night under my self-sewn tarp.
If you would rather not sew a tarp yourself, then check out my buying guide and recommendations for tarps.
How did you like the instructions?
Could you understand everything?
Do you feel like sewing your own tarp now?
Write your thoughts in the comments.


Author of the guide
Martin Gebhardt
Hey, I'm Martin. On my blog, you will learn the basics and numerous details about living in the wild. I think survival, bushcraft and the good life in nature are the keys to happiness. Find me here on Instagram or on YouTube. You can find more about my mission on the About Me page.
Since this is a gear guide, here ...
🤝8 reasons to trust my recommendation
-
Practical Experience: I have tested most of the products I recommend under extreme conditions myself.
-
Independence: As a wilderness mentor, I am not tied to any specific brands - this means my recommendations are unbiased.
-
Expertise: My many years of experience allow me to understand the intricacies and details of various products that a layperson might overlook.
-
Target group understanding: I understand the needs and challenges of outdoor enthusiasts, from beginners to seasoned experts.
-
Quality focus: I attach great importance to quality and longevity. These are characteristics that are crucial in the wild.
-
Clear communication: I try to explain the pros and cons of each product clearly and understandably so that you can make an informed decision.
-
Currentness: I always keep my guides up to date and adapt them to new findings or products.
-
Community Feedback: I work in wilderness schools, teach courses myself, attend courses and am active in various outdoor and survival communities and therefore integrate the feedback and experiences of others into my recommendations.
So when I introduce the best survival knives or flashlights, you can be sure that every recommendation is based on solid experience and extensive knowledge.
Was this guide helpful?
36 people found this guide helpful.
5.00 out of 5 points (36 Ratings)
Comments (0)
This post may contain affiliate links. So if you click on the links and make a purchase, I will receive a small commission at no additional cost to you. Click here, to learn more about it.