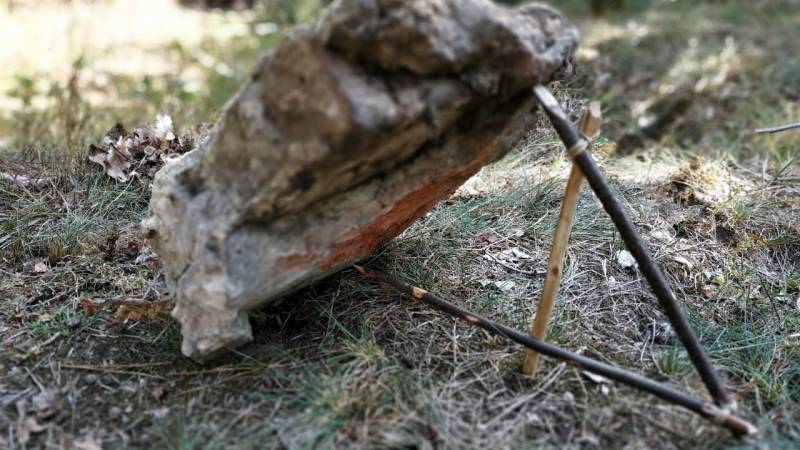
Survival Trap Building: How to build a simple deadfall trap
👉 The key facts from this guide
- Materials: You need a knife, string, a rock, bait, and three sticks.
- Construction: The sticks are cut and connected so that they form an inverted "4" and will collapse under the pressure of an animal.
- Function: When an animal touches the bait, it triggers the trap and the rock falls to kill the animal.
- Tips: Build multiple traps, place them where animals frequent, and check them at least once a day.
- Limitations: The trap must be large and strong enough to kill the desired animal, and the rock should be five times heavier than the animal.
- Important: Educate yourself on the legal regulations before setting up traps or hunting animals.
You are in the middle of the wilderness.
There is little to eat.
You can hardly stand the taste of blueberries anymore.
Your body craves energy.
Proteins from meat.
But big game hunting is out of the question. With what? A knife?
You'd rather hang from a boar's tusks than stab it with a knife.
Therefore, you focus on small animals, such as mice, squirrels, snakes, or birds.
Learn how to catch these animals using a deadfall trap in today's guide. This allows you to regularly obtain high-energy meat.
Trapping efficiently leads to meat
Do you know what the best thing about trapping is?
You use very little energy and can use the time that the traps are set up for other important tasks. Additionally, trapping helps to distract you from your difficult situation.
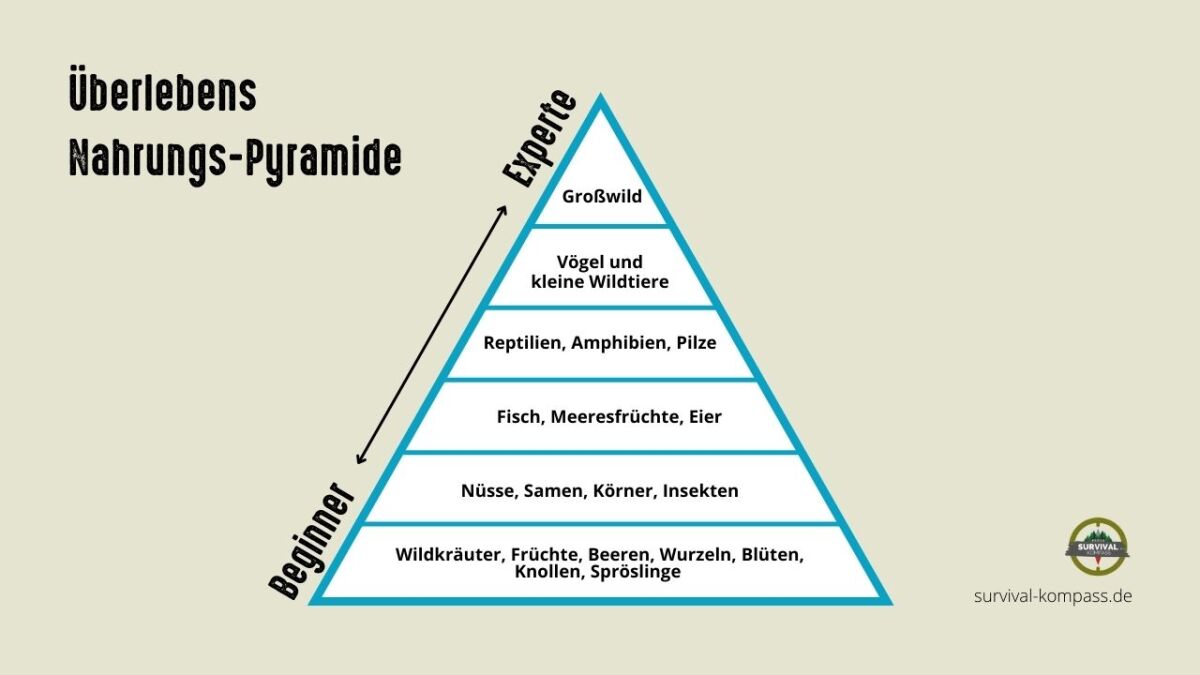
The Survival Food Pyramid clearly shows you that building traps is the first option to obtain meat.
The video about the deadfall trap
Attention: The article or video should in no way encourage you to kill animals. Before setting traps or hunting and killing animals in any other way, please familiarize yourself with the legal regulations. You may only intervene in the existing ecosystem in case of extreme emergency and for the purpose of survival. Please refer to my disclaimer and my article "Can I Hunt Animals and Build Traps?".
You'd rather watch the video on this topic? No problem, here it is:
The Material for the Deadfall Trap
My method for the deadfall trap requires string. String is especially significant in emergencies and in the article "How to make your own ropes" I show you how to make them yourself.
Now the list of materials for the trap:
- a knife or sharp object to carve sticks
- string
- a stone
- bait
- three sticks
The stone
It is best if it is five times heavier than the animal you intend to kill. After all, the stone must kill the animal. Some animals do not die immediately, but suffocate.
The bait
A frog leg, a worm, or a beetle. Squirrels and chipmunks like nuts, seeds, and fruits. Yes, even a piece of red cloth can attract animals. There are reports that even urine and feces can attract animals.
However, if acorns are everywhere on the ground, you surely won't have success with an acorn in your trap. You have to offer the animals a special treat.
The Sticks
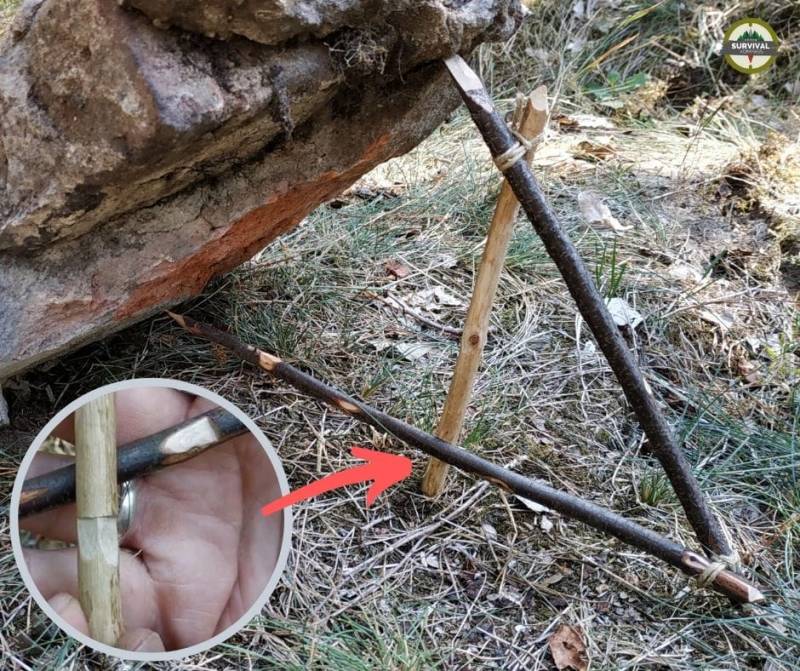
These are your most important materials. You carve the mechanism from the sticks. I'll show you how to do it.
- The sticks must be tied together like an inverted four, as shown in the top image
- A bait is attached at the end of the horizontal stick, below the stone
- The trigger mechanism is made from half-round notches
- Then attach the stone as weight and the construction will hold
Here's the exact instruction for the trigger mechanism of the sticks. The setup can be seen in the images.
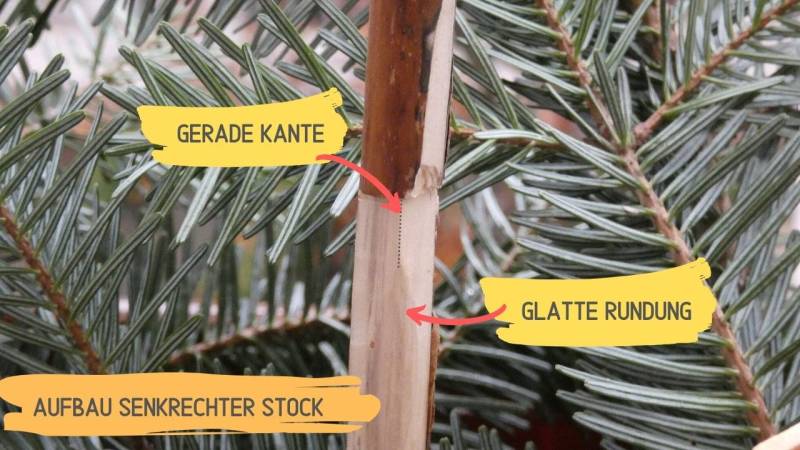
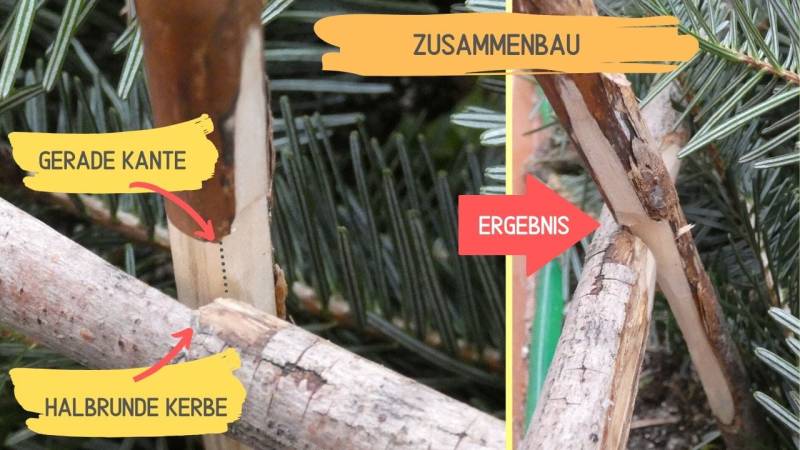
If an animal presses down on the horizontal stick, it will leave the edge and the mechanism will collapse due to the rounding.
First, make the vertical stick by carving two half-round notches to create a very straight edge. Then, round the edge downwards.
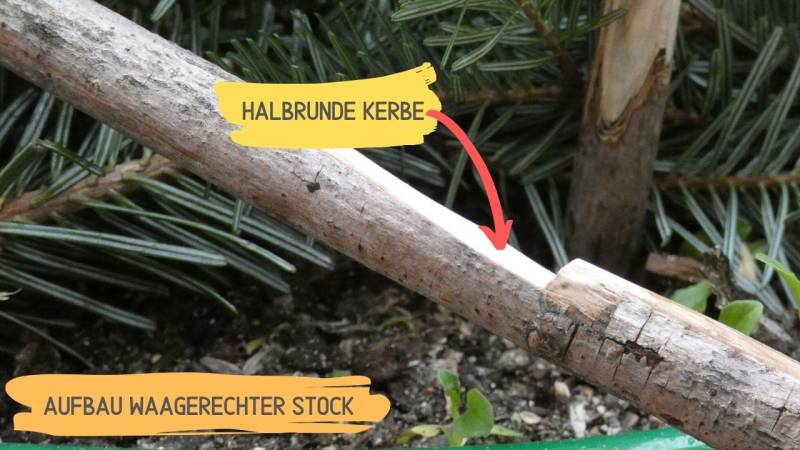
Then you create the horizontal stock. It should have a half-round notch, as seen in the image below.
Finally, place the half-round notch of the horizontal stock exactly at the edge of the vertical stock.
Then place the stone on the inclined stick. Test the trap several times to make sure it works.
Now you know how to build a deadfall trap. To ensure it doesn't remain empty, I strongly recommend my tips for trap building.
Tip 1: Number of Traps
One trap won't get you far. Build at least ten to twelve traps. The more traps you set, the more likely you are to catch something. This doesn't mean you should set 30 traps without a plan. Read on and you'll see what I mean.
Tip 2: Finding the right place
Search for places where animals hang out. These may be animal paths, feeding areas, watering holes, or dens. Even an apple tree can be a paradise for mice.
Tip 3: Which animal do you want to catch?
Check if your trap is big and strong enough to kill your preferred animal. A rule of thumb states that the rock should be five times heavier than the animal.
A house mouse weighs 20 grams, a field mouse 27 grams, and a Norway rat 230 grams. For the mice, a 200-gram rock is sufficient. For the Norway rat, you need to find a rock that weighs 1.2 kilograms.
Enter the area where you want to set the trap and leave your scent. This signals the animals that it's a safe place and makes them more likely to be around.
Tip 4: Guide Fences
Influence the path of animals by setting up guide fences or blocking off other paths. Guide fences increase the chances that animals will notice your trap.
Tip 5: Your Scent
Enter the area where you want to set up the trap and leave your scent. This signals to the animals that it is a safe place and increases the likelihood that they will stay nearby.
There is no uniform opinion on the subject. Some experts (Rüdiger Nehberg) believe that the smell of humans must be masked at all costs. You are not even allowed to modify the environment and therefore cannot build any fences.
And other experts (Dave Canterbury) say:
Tip 6: Checking traps
The regulation of smells is overestimated. It's completely unnecessary to want to strongly suppress the human smell. Mammals are curious, and they are all sniffers – they want to know what has been where and why.
At least once a day, you should check the traps. This will spare the animal unnecessary suffering if it is still alive. Additionally, you would rather not share your catch with other predators.
Summary
Trapping and building traps are essential skills for any survivalist.
This also includes knowledge of trap building, or else your traps will remain empty.
How much are you setting up? What bait are you using? Ask yourself these questions when you start building your trap.
How do you like the guide? What other traps do you know?
Write your impressions in the comments.


Author of the guide
Martin Gebhardt
Hey, I'm Martin. On my blog, you will learn the basics and numerous details about living in the wild. I think survival, bushcraft and the good life in nature are the keys to happiness. Find me here on Instagram or on YouTube. You can find more about my mission on the About Me page.
Was this guide helpful?
35 people found this guide helpful.
4.89 out of 5 points (36 Ratings)
Comments (0)
This post may contain affiliate links. So if you click on the links and make a purchase, I will receive a small commission at no additional cost to you. Click here, to learn more about it.


